In-Depth Guide to Pet Portrait Photography
Everything you need to know about photographing your pet for a commissioned portrait, from lighting and angles to specific breeds, horses, memorial photos and sending your files.
By Melanie Phillips and Nicholas Beall — Professional Pet Portrait Artists since 1996
The photograph you provide is the single most important factor in your portrait outside of the artist themselves. It is the foundation everything is built upon. Over 28 years and 850+ commissions, we have worked from every kind of photo imaginable. Perfect studio quality shots, blurry old prints, dark phone snaps and everything in between. That experience has given us a very clear picture of what works, what causes problems and how to help clients get the best they possibly can from what they have.
This guide covers everything in depth. If you just want the quick essentials, our Photography Tips page has you covered. But if you want to understand the full picture and give your portrait the best possible chance of being exceptional, read on.
What This Guide Covers
- Why the photograph matters so much and what happens when it falls short
- Understanding natural light and why it is so important for both pencil and oil portraits
- Camera angle, distance, zoom, and how these affect the finished artwork
- The eyes — why they are the most critical part of any reference photo
- Capturing personality rather than just pose
- Photographing dogs, cats and horses, specific guidance for each
- Black, white, and dark-coated animals — the extra care needed
- Multiple pets in one portrait — how to approach this
- Memorial portraits — working with what you have
- Collars, tack, and things you might want removed
- Backgrounds — when they matter and when they don't
- How to send your photos and what file quality we need
- The mock-up process — how we work with your photos before starting
- What to do if your photos aren't perfect
 A strong reference photo is the foundation of everything
Why the Photo Matters So Much
When you commission a pet portrait, you are asking us to create a likeness of a living animal. A specific individual with their own expression, personality and physical detail. We can only work with what we can see. If the photo is dark, blurry, taken from an unflattering angle, or missing the detail we need, it directly limits what we can achieve in the finished portrait.
The reverse is also true. When we receive a really good reference photo, well lit, sharp, taken at eye level, showing the pet relaxed and being themselves, the portrait has every chance of being exceptional. We have completed work from wonderful photos that we still think about years later, because the image gave us everything we needed to bring the animal to life on paper or canvas.
This is not about having an expensive camera. Virtually every portrait we have created in recent years has been drawn or painted from smartphone photographs. Modern phone cameras are genuinely excellent. The difference between a good photo and a poor one has almost nothing to do with the equipment and everything to do with the conditions, the angle and the moment.
The best reference photo is not necessarily the most beautiful photo of your pet. It is the one that gives us the clearest, most detailed view of their face, fur, and eyes in good natural light.
 Melanie's Pet Portraits Desk
Natural Light - Why It Makes Such a Difference
Natural daylight is the single biggest factor in photograph quality for portrait purposes. It is not about brightness, it is about the quality of the light itself. Natural light shows the true colour and texture of fur, reveals the fine detail around the eyes and muzzle and creates the soft shadows that gives the three dimentional form.
Artificial indoor lighting tends to cast a warm orange or yellow tint across the coat. It flattens the fur, obscures fine detail and makes eyes look dark and difficult to read. Flash is even worse, it bleaches the coat, creates harsh flat light and often produces red eye.
The best conditions are outdoors on a bright overcast day. The cloud acts as a giant diffuser, giving you soft, even light from above with gentle shadows. There are no harsh patches of sun and shade to contend with and the pet's coat is beautifully lit from all sides.
A sunny day also works well, but requires a little more thought. Direct strong sunlight can bleach lighter coats and create hard shadows across the face. Position your pet so the sun is behind you or coming from one side, not directly overhead and not shining into their eyes. Early morning or late afternoon light on a sunny day is often particularly lovely.
If you cannot photograph outdoors, find a large window and position your pet so the light falls across them from one side. Step back from the window a little. Side lighting from a window can create beautiful results. It brings out the texture of the coat and gives the eyes a natural catch-light, which is that small bright reflection that makes an animal's eyes look alive.
Light in order of preference
- Outdoors on an overcast day — even, soft, no harsh shadows
- Outdoors on a sunny morning or late afternoon — beautiful if well positioned
- Outdoors on a sunny midday — workable but watch for harsh overhead shadows
- Indoors near a large window — very usable, especially with side lighting
- Indoors in general room lighting — possible but colour accuracy affected
- Indoor flash photography — avoid if at all possible
 Melanie taking photos of Lily in our garden with our studio in the background
Camera Angle — Getting Down to Their Level
This is the piece of advice we give more than any other and it makes a bigger difference than almost anything else. Most people naturally photograph their pets looking slightly downwards. They are standing, the pet is on the floor and they just point the phone down. The resulting photos look perfectly fine as pet snapshots. But as portrait reference material, they cause real problems.
When a photo is taken from above, the dog or cat's head appears disproportionately large relative to the body. The perspective is distorted in a way that reads oddly when translated into a portrait hanging at eye level on a wall. The animal looks as though they are crouching slightly, and the relationship between head, neck, and shoulders is compressed.
When you get down to your pet's eye level, genuinely down, whether that means kneeling, lying on the floor, or sitting on the ground everything changes. The proportions become natural. The neck and chest are visible. The eyes are looking straight at you rather than slightly upward. The whole image has a dignity and presence that translates beautifully into artwork.
For small dogs and cats, this might mean getting quite low. A picnic bench, garden steps, or a sofa can help. Place them at a raised level so you can photograph without distorting the angle. For larger dogs and horses, you may only need to crouch slightly. The key is to have the camera lens at roughly the same height as your pet's eyes.
If you can only make one change to how you photograph your pet, make it this one. Get down to their level. It transforms the portrait reference material more than anything else we can suggest.
Distance and Zoom — The Right Way to Frame the Shot
Smartphone cameras have a wide-angle lens built in, which is great for landscapes and group shots but problematic for close-up pet photography. If you hold your phone close to your pet's face to fill the frame, the lens distorts the image — the nose appears much larger than it should be in relation to the rest of the face, and the overall proportions look odd. You will have seen this effect; it is sometimes called "nose cam" and it makes even the most photogenic dog look slightly strange.
The solution is simple: step back from your pet — perhaps two or three times further away than you instinctively want to be — and then use your phone's zoom function to bring them back into frame. This uses a more telephoto end of the lens which compresses perspective in a natural way, producing much more accurate proportions. It also tends to create a pleasantly blurred background, which makes the pet stand out cleanly.
You do not need optical zoom — digital zoom works perfectly well for portrait reference purposes, as long as you are photographing in good light. The image will be sharp enough at normal zoom distances to give us plenty of detail to work from.
Getting the distance right
- Step further back than feels natural — at least a metre or two for a head study
- Use your phone's zoom to bring them back into frame rather than walking forward
- For a full-body portrait, make sure paws, tail, and the top of the head are all in the frame
- For a head and shoulders portrait, focus on filling the frame with the face and upper chest
- Never crop the original photo before sending — we always prefer the full uncropped image
- Do not use a filter, edit, or compress the image before sending it to us
 Melanie drawing Widgeon in our studio
The Eyes — The Most Important Part of Any Photo
If there is one technical requirement above all others, it is this: the eyes must be in sharp focus. Everything else — posing, lighting, composition — can be worked around to some degree. Soft, blurry, or dark eyes cannot. They are the part of the portrait that brings the animal to life, and if we cannot read the detail in them from the photograph, we cannot reproduce them accurately in the artwork.
Most modern smartphones focus automatically on the face when you take a portrait. However, if there are multiple subjects in the frame, or if the pet is moving, the phone may focus on the wrong thing. The most reliable approach is to tap the screen directly on your pet's eye before pressing the shutter. This locks focus there, and you will see the image sharpen on the screen before you take the shot.
What we are looking for in the eye area: the pupil should be clearly defined, the iris colour or dark tone should be visible, any catchlight (the small bright reflection) should be sharp, and the fine fur around the eye socket and muzzle should show individual hairs rather than a blurry wash of tone.
It is worth taking many photos and reviewing them carefully on a larger screen before sending. What looks sharp on a phone screen at thumbnail size may not be sharp enough when we look at it at working size. Zoom in on the eyes in your photo before deciding it is a good one.
If your pet rarely holds still long enough for a focused shot, use burst mode — hold down the shutter button and take ten or fifteen photos in quick succession, then choose the sharpest from the sequence. Patience is the other tool: quiet moments when your pet is settled, sleepy, or gently interested in something tend to produce the best results.
 The perfect photo of Lily very happy after grooming
Capturing Personality — What Makes a Portrait Special
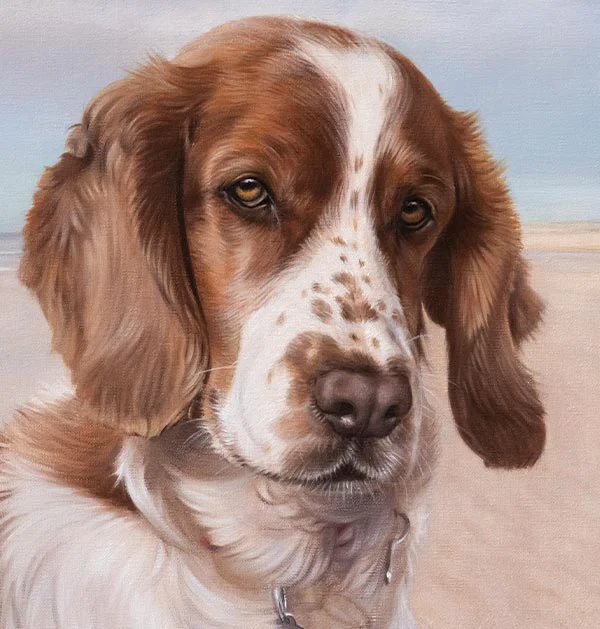
The photographs that produce the most moving portraits are almost never the posed ones. They are the candid shots where the pet is simply being themselves — the cocker spaniel with her ears swept back mid-run, the cat stretched in a pool of sunlight, the old Labrador watching you with that particular expression that only you recognise as their version of love.
When we see that kind of photograph, something clicks. We know immediately that this image captures something true about the animal. And that truth is what we try to translate into the portrait.
The forced "sit-stay" photo, where the dog is looking slightly uncertain about what they are being asked to do, rarely produces a portrait that makes people catch their breath. It looks like a passport photo. The best portraits feel like a window into the animal's character.
So rather than orchestrating a photoshoot, try simply having your camera ready during normal life. Feed time, walk time, a quiet evening on the sofa — these moments often yield the best material. The expression your pet has when they hear your car pull up on the drive. The way they watch you eat breakfast. The look they give you when you pick up the lead.
If you do want to get their attention for a more alert, forward-facing expression, try making an unusual noise — a whistle, a squeak, or even just calling their name in a surprised tone. Holding a treat just above the camera works well too. The moment just after you call them is often better than the moment of calling — their ears are up and they are focused, but they have not yet moved towards you.
Send us the photos that make you smile when you look at them. That reaction usually means the photo has caught something real — and that is exactly what we need.
Photographing Dogs
Dogs are simultaneously the most photographed pets and the most difficult to photograph well for portrait purposes. They move quickly, lose interest rapidly, and often have exactly the expression you want for about half a second before doing something entirely different.
The most important thing you can do is take a large number of photos rather than trying to engineer the perfect single shot. Even professional pet photographers take hundreds of frames to get a handful of usable images. Give yourself that latitude and review them afterwards.
A dog in a sitting or lying position is much easier to photograph than one standing, because they are more stable. A settled dog will hold an expression long enough for you to capture it properly. If your dog is food-motivated, holding a treat just above and behind your camera will get you focused, alert attention — but time the shot for just before or just after, when the expression is natural rather than expectant.
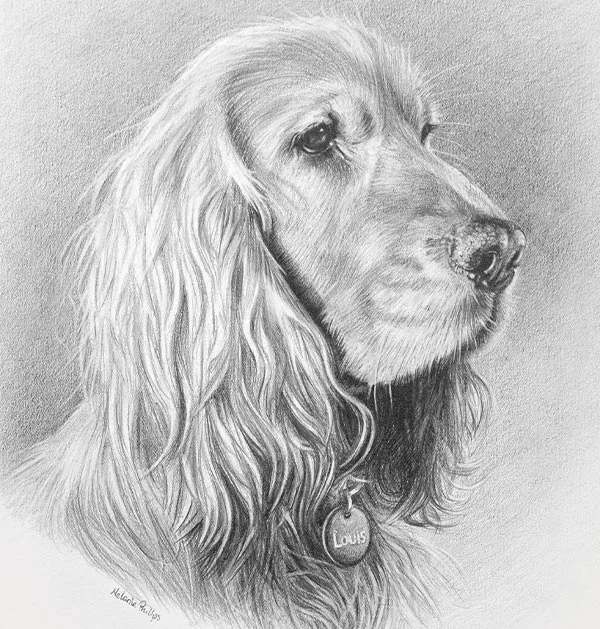
Think about which of your dog's features you most want captured. Their ears — are they usually up and alert, or flopped softly? Their coat — is there a particular texture or colour in the sun that you love? Their expression when they are watching birds from the window? These specifics are worth thinking about before you start, because they will guide which photos are most valuable.
For dogs with very long coats — Afghans, Old English Sheepdogs, Spaniels — pay particular attention to the area around the eyes. Long facial fur can obscure the eyes in photos, especially in flat light. A good angle and strong directional light can help reveal the eyes even through the fur. Send us photos from several angles so we have the best chance of seeing what is underneath.
Photographing Cats
Cats, famously, do not take direction. This is actually less of a problem than it sounds, because the best cat portraits invariably come from photos where the cat is doing exactly what they want to do — and doing it beautifully in natural light.
Cats at rest are excellent portrait subjects. A cat in a sunny spot on a window ledge, on their favourite chair, or simply watching the world from a comfortable position is presenting you with everything you need: they are still, they are relaxed, their expression is natural, and if you can position yourself at their level, the light is often working in your favour.
The challenge with cats is often focus. Cats move fast and unpredictably, and a phone camera can struggle to lock focus quickly enough. Use burst mode liberally. Tap to focus on the eye before the shot if you can, and take many more photos than you expect to need.
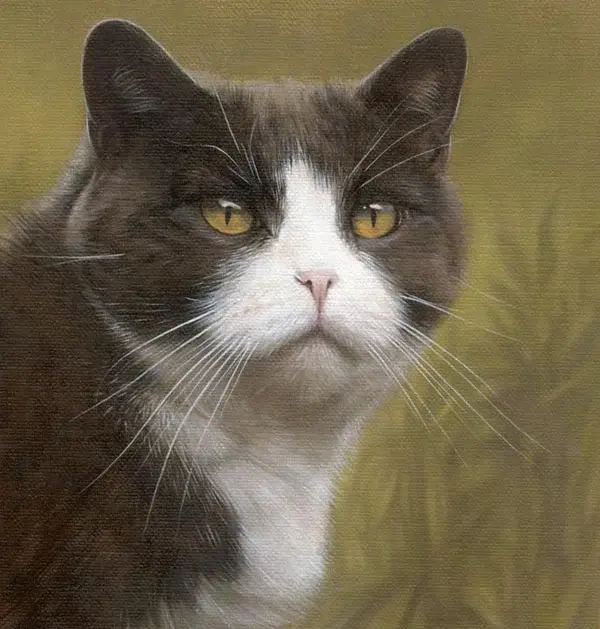
If your cat has dark markings around the eyes — common in tabbies and many other breeds — pay close attention to how visible the eyes are in your photos. In lower light, dark markings can make the eyes almost invisible. Strong natural light from the right angle will reveal them. A photo where the eyes are clearly readable, even through patterned markings, is always preferable to a beautiful photo where the eyes are lost in shadow.
For cats with flat faces — Persians, British Shorthairs, Exotic Shorthairs — the profile is often more revealing than a full-face shot. Consider photographing from a slight angle that shows the structure of the face rather than directly front-on, which can make the nose and eyes appear very compressed.
 The perfect photos of Mr Paws
Photographing Horses
Horse portraits present particular challenges and particular rewards. Horses are large, often photographed in outdoor settings with variable light and distracting backgrounds, and the question of tack requires thought before you even reach for your camera.
Tack or no tack? This is the first decision to make, and it needs to be made before you take the photos. If you want your horse portrait to show a bridle, martingale, or headcollar, photograph them wearing it — clean, well-fitted, as you would want it to appear in the portrait. If you want a natural portrait without any tack, photograph without it. It seems like an obvious point, but it matters enormously: removing tack from a reference photo artistically involves guessing what lies beneath it, particularly around the face and cheek. This introduces uncertainty that we would rather avoid. Send both versions if you are not sure which you prefer.
The same applies to rugs. A horse in a full winter rug cannot be drawn as though unrugged — we cannot see what we cannot see. If you would like your horse drawn without a rug, photograph them without one.
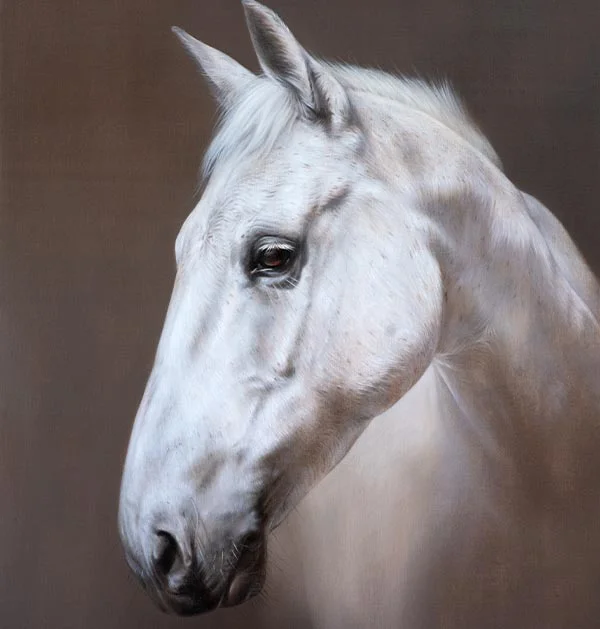
For angle and position, a three-quarter view showing the head, neck, and part of the shoulder is usually the most elegant for a portrait. Stand roughly level with your horse's chest — not below looking up, which creates a foreshortened neck, and not on high ground looking down. Outdoors in a stable yard or field in natural daylight is ideal. Stable interiors tend to be too dark for good reference material.
If your horse has a summer coat, that is an excellent time to photograph them — the coat lies flat and fine, revealing the musculature and detail of the face beautifully. A thick winter coat gives a softer, more rounded appearance. Both can produce beautiful portraits, but bear in mind that turning one into the other is not straightforward artistically.
Horse photography checklist
- Decide on tack before the photo session and photograph accordingly
- Outdoors in natural daylight — stable yard or field
- Three-quarter angle showing head, neck and shoulder
- Stand level with the horse — not looking up or down
- Take photos from both sides — we may have a compositional preference
- Try to get the ears forward and alert if possible
- Send multiple photos — we are happy to choose or advise
Black, White, and Dark-Coated Animals — Extra Care Needed
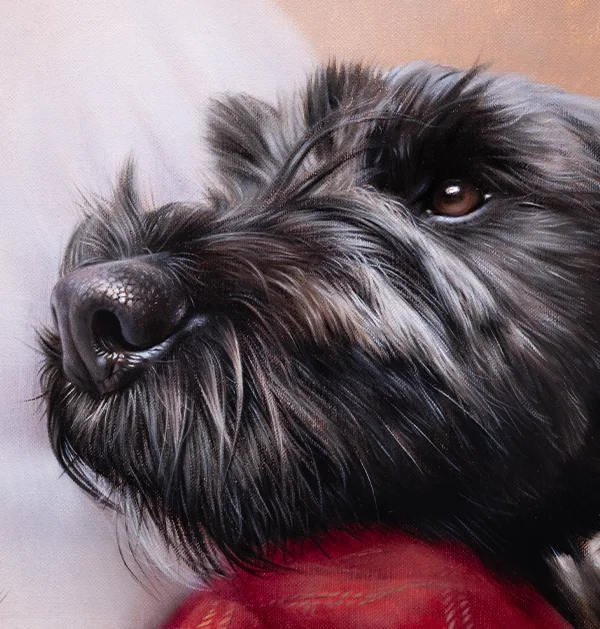
Black pets and dark-coated animals are genuinely more difficult to photograph well for portrait purposes, and it is worth knowing why so you can actively compensate for it.
A camera's exposure system is designed to average out the brightness of a scene to a mid-grey. When most of the frame is occupied by a dark subject, the camera tends to overexpose slightly to compensate — which can wash out any lighter areas and lose the fine detail in the coat. At the same time, the dark fur absorbs light, so the texture and direction of individual hairs can become invisible in anything less than bright conditions.
The key is bright, even natural light — the brighter the better. Overcast daylight is ideal because it lights the coat evenly from multiple directions, picking out texture without creating deep shadows. Strong directional sunlight can work beautifully but requires careful positioning to avoid one side of the animal being completely in shadow. Photograph against a lighter background where possible — a pale wall, a light-coloured floor, a patch of dry grass — to help the camera expose for the animal rather than the surroundings.
For black cats and dogs specifically: take more photos than you think you need, and review them carefully by zooming in on the coat before sending. You should be able to see individual hairs and the direction of growth in a well-lit photo. If the coat looks like a flat black shape with no texture, the photo is not quite there yet.
White and very pale animals present the opposite challenge — pale coats in bright sunlight can be bleached of all detail. Slightly softer light, or shade, often works better for white animals than full sun. The same principle applies: you should be able to see individual hairs and the subtle variation of colour across the coat in the best photos.
 Lily's grooming photos for good reference material
Multiple Pets in One Portrait
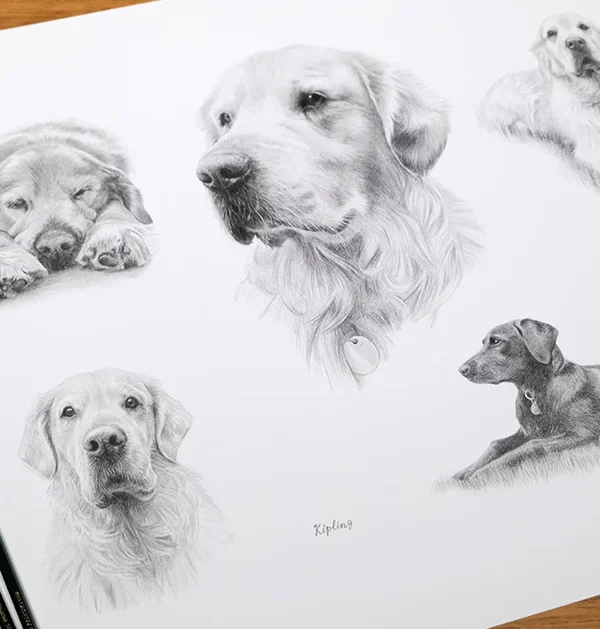
Some of the most beloved portraits we have created are of two or three animals together — a pair of dogs that have grown up together, a cat and dog that have become unlikely friends, a family of horses. These are always meaningful commissions, and the approach to photography is a little different.
The ideal scenario for a multi-pet portrait is to have clear, individual reference photos of each animal, plus any photos of them genuinely together that you particularly love. The reason for this is practical: getting two or more animals in the same perfect photo at the same moment — both facing the right way, both in sharp focus, both with a natural expression — is genuinely difficult. Cats and dogs together are especially challenging.
We create a design mock-up before starting any commission, which includes working out how to combine your photos into a balanced composition. Using separate individual photos gives us much more flexibility to position the animals naturally, balance their sizes, and create a composition that feels as though they were always together in the scene.
When photographing multiple pets for this purpose, try to use similar lighting for each animal — ideally the same day, the same location, similar time of day. This makes the colours and shadows consistent across the final composition. Photos of each animal from the same direction (both facing left, or both facing right) also give us more options for how to arrange them together.
If you have a wonderful photo of your pets genuinely together, send it along with the individual shots. Sometimes the chemistry between two animals in the same frame is irreplaceable and we will work around any technical limitations to use it.
Memorial Portraits — Working with What You Have
A significant proportion of the portraits we create each year are for clients who have lost their pet. These commissions come from a place of grief and love, and we approach them with particular care. One of the most common anxieties people have when contacting us about a memorial portrait is that their photos are not good enough. In almost every case, that worry is unfounded.
We have created memorial portraits from old printed photographs that have been scanned and sent to us, from blurry phone snapshots taken years ago, from videos where we have screen-grabbed the best frame, and from a combination of photos from different periods of the animal's life. The aim in every case is to create something that captures the animal as you remember them — which is an artistic and emotional process as much as a technical one.
If your pet has passed away, our advice is to send us everything you have. Every photo, however old, however imperfect. A photo you dismissed as too blurry might have exactly the expression you want in the background. An old print might give us detail about their colouring that a dark phone snapshot does not. More is always better when working from archival material.
We will look through everything carefully and talk to you about what is possible and what we recommend before any work begins. There is no photo too imperfect to discuss — we would always rather you sent something and let us advise than assume it was not usable.
For memorial commissions: please send everything. Old photos, printed photos that have been scanned, video stills, photos from family members. We will go through it all and find what we can work with. You will be surprised what is possible.
 Memorial portraits, send all of your photos if you can.
Collars, Harnesses, and Things You Might Want Removed
Most of the time, collars and name tags can be removed from the portrait without any problem. It helps to have a second photo of your pet without these items — particularly if the collar is wide or sits high on the neck — so we can see the fur and neck structure underneath. But even without an alternative photo, a plain collar on a well lit dog is usually straightforward to omit.
Harnesses are more complex, particularly if they sit across the chest area you want included in the portrait. A wide-strapped harness covering the chest in a head-and-shoulders portrait requires more interpretation. Again, a second photo without the harness is helpful if you have one.
Leads, ropes, and anything held by a person can generally be removed. Backgrounds can be changed, simplified, or replaced entirely — if you would like your pet drawn against a plain toned background rather than the washing line visible in the garden photo, that is completely achievable.
Things that are much harder to remove or change: eye goop, healed scars, and distinctive markings. These are part of your pet's identity and we would generally include them unless you specifically ask otherwise. Grey muzzles and signs of age are often the most beloved aspects of a memorial portrait — the specific marks of a life lived. We always follow your lead on what you would like included or softened.
How to Send Your Photos — File Quality and Method
The single most important rule when sending photos is to send the original file directly from your camera or phone. Do not screenshot the photo. Do not save it from a social media post. Do not send it via WhatsApp before emailing it to us. Every one of these steps compresses the image and loses quality that we cannot recover.
When you share a photo via WhatsApp, the app compresses it significantly to reduce data usage. The resulting file is a fraction of the size of the original and has lost a considerable amount of detail. When you save a photo from Facebook or Instagram, the platform has already compressed it multiple times. A screenshot of a photo on your phone screen is an image of an image — doubly degraded.
The original file from your phone's camera roll is the one we want. On an iPhone, this is the file in Photos before any edits or shares. On Android, it is the original in your gallery or camera folder. Send it directly from there to our email address.
How to send large photo files
- Email directly — for files up to around 10-15MB, email attachment is fine
- WeTransfer — free service at wetransfer.com, excellent for large files, no account needed
- Dropbox — if you use it already, sharing a folder works well
- Google Drive or iCloud — sharing a link to an album is convenient
- WhatsApp to us — the quality loss is less severe when sending directly to us than sharing to a group, but we still prefer email if possible
If you are unsure whether a photo is good enough to work from, just send it and ask. We look at photos all day every day and can give you a quick honest assessment. We would always rather spend two minutes telling you what we can see in a photo than have you talk yourself out of sending something that might be exactly what we need.
The Mock-Up Process — Working Together Before We Start
One of the things that sets our commission process apart is that we never pick up a pencil or brush until you have seen and approved a design mock-up showing exactly how your portrait will be composed. This is particularly important when it comes to photos, because it gives us the opportunity to work through any questions together before the artwork begins.
When you send your photos, we look through them all and prepare a mock-up showing our recommended composition — which photo we plan to use as the primary reference, how we propose to crop and frame it, and whether we think elements from other photos might be combined to improve the result. If we have any concerns about photo quality in specific areas, we will flag them at this stage and suggest ways to address them.
This is a conversation, not a decision handed down from on high. If you have a strong preference for a particular photo or expression, tell us — even if you are not sure it is technically ideal. Often we can work around limitations that might not be obvious to you, and occasionally your instinct about which photo captures your pet best is more valuable than any technical consideration.
The mock-up stage is also when we discuss any changes — removing collars, adjusting the background, considering whether a different crop might work better. It costs nothing and takes very little time, and it means that when work does begin, both of us know exactly what we are aiming for.
 Mockups of two Beagles from separate photos.
What If Your Photos Are Not Perfect?
Most of the photos we receive are not perfect. That is the honest truth after 28 years of working from client reference material. The vast majority of portraits are not created from ideal conditions — they are created from the best available photo of a beloved animal, and that is completely fine.
We have worked from photos taken through a car window, photos taken on old film cameras and scanned decades later, photos where the best expression is in the background while the focal point is elsewhere, photos where the lighting is less than ideal but the pose is irreplaceable. In each case, the question is not whether the photo is perfect but whether it has enough information for us to create a truthful portrait.
What we need as a minimum: the face should be visible and relatively sharp, the eyes should be readable (even if not perfect), the basic proportions and structure of the animal should be clear, and the image should not be so small or compressed that there is no detail left to work with.
What helps enormously when photos are less than ideal: multiple photos from different angles, occasions, and lighting conditions. Each photo might give us something the others lack — one has the right expression, another shows the colour of the coat more clearly, a third reveals the structure of the ear. Between them, a collection of imperfect photos can give us a comprehensive picture of the animal.
Please do not let worry about photo quality stop you from making an enquiry. Send us what you have and we will give you an honest assessment of what is possible. There is no obligation and no silly questions. We have been doing this since 1996 — we have seen everything, and we love a challenge.
Complete Photography Checklist at a Glance
Natural Light
Outdoors on an overcast day is ideal. Sunny days work well. Indoors near a large window is good. Avoid flash and harsh artificial light.
Eye Level
Get down to your pet's actual eye level. Kneel, sit, or lie on the floor. This transforms the proportions and presence of the portrait.
Eyes in Focus
Tap on the eye on your screen to lock focus there. Review photos zoomed in before sending. Sharp eyes are non-negotiable.
Step Back and Zoom
Move further away and zoom in rather than getting close. This avoids wide-angle distortion and produces natural proportions.
Personality First
Photos where your pet is naturally themselves — not posed or performing — produce the most alive and meaningful portraits.
Send Plenty
There is no such thing as too many photos. More choice gives us more to work with. Send everything that might be useful.
Original Files Only
Send the original file from your camera roll. No screenshots, no WhatsApp shares, no social media saves. Original quality only.
Uncropped Images
Send the full uncropped original. We can decide on composition — but we cannot work with what is outside the frame.
Ask Us
If you are not sure whether a photo is good enough, just ask. We look at photos every day and will give you an honest, helpful answer.
Photography Questions — Answered
Everything we are regularly asked about reference photos, answered honestly from 28 years of experience.
Sharp focus on the eyes. Everything else can be worked around to some degree — lighting, angle, even photo quality — but soft or blurry eyes make achieving a true likeness very difficult. Tap your phone screen directly on your pet's eye to lock focus there before taking the shot, and review photos zoomed in before sending them to us.
In most cases, yes. Send us everything you have and we will give you an honest assessment. Old printed photos that have been scanned, blurry phone snapshots, video stills — we have worked from all of these. The more photos you send, the better our chances of building a complete picture of the animal from the best elements of each one.
Use burst mode — hold down the shutter and take a rapid sequence of photos, then choose the sharpest from the series. Photograph during naturally settled moments: after a walk when they are tired, at feeding time when their attention is directed elsewhere, or in the evening when they are relaxed. Patience and quantity are the main tools here.
Bright natural light is essential for dark-coated animals. Overcast daylight is ideal — it is even and picks out texture well. Photograph against a lighter or contrasting background where possible. Take more photos than you think you need and check them carefully zoomed in. You should be able to see individual hairs and fur direction in a well-lit photo of even a very dark-coated animal.
Yes, collars and name tags can usually be removed without any difficulty. Harnesses are more complex depending on how much of the chest they cover. It always helps to have a second photo without the item so we can see the fur and neck structure beneath. If you only have one photo with the collar, let us know and we will advise on whether removal is straightforward.
Decide before you take the photos and photograph accordingly. If you want the tack included in the portrait, photograph wearing clean, well-fitted tack. If you want a natural portrait without tack, photograph without it. Removing tack from a reference photo artistically involves guessing what lies beneath — particularly around the face and cheek — which we prefer to avoid. If unsure, send both versions.
As many as you have that might be useful. There is genuinely no such thing as too many. More photos give us more options when selecting the best composition, and often different photos reveal different things — one has the right expression, another shows the coat colour more accurately, a third has better light. We are happy to look through everything.
Absolutely. Many of our most treasured commissions have been created from older photos. The key question is always whether there is enough visible detail to work from — particularly around the eyes. For memorial portraits especially, please send everything you have, including old prints that have been scanned. We will go through it all carefully.
Email is always preferable because WhatsApp compresses images significantly to reduce data usage. The original file from your camera roll sent as an email attachment retains full quality. If a file is very large (over 15-20MB), use WeTransfer — it is free, requires no account, and delivers files at full quality. If WhatsApp is all that is practical, send directly to us rather than through a group, which reduces the compression slightly.
We will tell you honestly and explain specifically what would help. Sometimes a small adjustment — slightly brighter light, a different time of day, a different position — makes a significant difference. We will never start work on a portrait if we have concerns about the photo quality that we have not discussed with you first. Our aim is always for you to be delighted with the result, and that conversation at the start protects both of us.
Ready to Commission Your Portrait?
We hope this guide has answered every question you had about reference photos — and probably a few you had not thought to ask yet. If anything is still unclear, or you would like us to look at a photo before committing to anything, please just get in touch. We respond to every enquiry the same day and we genuinely love talking about portraits at any stage of the process.
You can also take a look at our shorter Photography Tips page for a quick reference summary, our Prices and Commission Information page, or How It Works to understand the full commission process from first contact to delivery.